I recently started exploring OpenID/OAuth authentication/authorization concepts hoping to develop ASP.NET Web Form applications enabled for Single Sign One with OpenID Providers. A provider could be Google, Yahoo, Facebook, Myspace etc ...
In this article, I will show you how to enable an ASP.NET Web Form's application to authenticate/authorize with OpenID Providers like Google, Yahoo, OpenID, myOpenID, Wordpress, etc ... I won't go into explaining OpenID standards as there are so many articles out in the jungle that you can grab & read. Therefore, what I will do is offer you some useful material that I will recommend you go over them to get the details of OpenID and its extensions.
Prerequisites
Before you go on reading this article, I suggest you review the following links:
- OpenID Authentication 2.0
- OpenID Simple Registration Extension 1.0
- OpenID Attribute Exchange 1.0
- OpenID Provider Authentication Policy Extension 1.0
- Integrating OpenID in an ASP.NET MVC Application using DotNetOpenAuth
- Federated Login for Google Account Users [Gives a very detailed explanation on how Google implements the OpenID Dance]
Glossary of Terms
- OP: OpenID provider - Google is one OP that accepts requests to authenticate users
- RP: Relying Party - The application initiating the OpenID dance i.e. requesting to authenticate a user through OP
- SREG: OpenID Simple Registration Extension
- AX: OpenID Attribute Exchange Extension
- SSO: Single Sign On solution - Logging in to multiple applications at once. In other words, when you log in to a certain application, automatically you get logged in to another.
Introduction
Everyone wants to be part of the social media/networking nowadays! With the continuous advent of a fair amount of online networks, users' demands are getting higher and starting to request more from Web application to integrate with those social media networks. Imagine, you would need a set of credentials to access Facebook, another set to access Twitter, another to access MySpace, another to access etc .... Wouldn't that be so hectic and bothering?
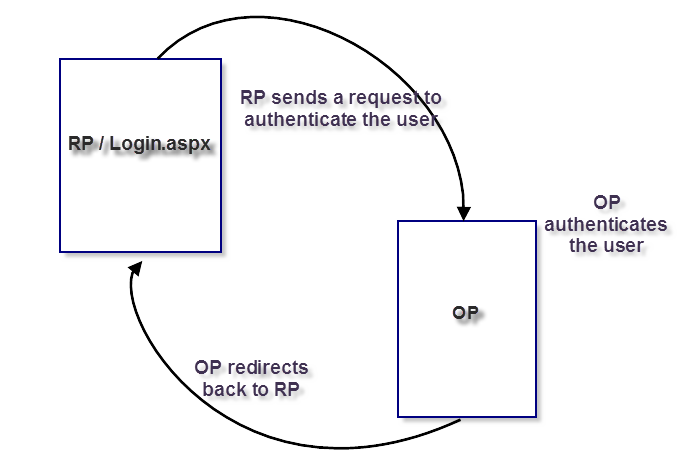
The solution would be best if we could have a single sign on among all those applications. That's why OpenID is there! It is an open standard used to allow authentication of users against third-party "Authentication Providers", in such a way that when the 3rd party application known as "RP" is about to authenticate a user, the user is being redirected to the 3rd-party authentication provider known as "OP". The user provides his/her credentials to the OP, gets authenticated, and then the OP redirects the user back to the RP.
Enough OP and RP :). For instance, you are logging on to www.stackoverflow.com,

That was a brief introduction on how OpenID works. To have a deeper understanding on OpenID, I suggest to thoroughly read the articles mentioned above in the prerequisites section and specifically the Federated Login for Google Account Users. In that article you can find a clear diagram describing the OpenID Dance as implemented by Google, but almost a generic way that most other OPs follow the same steps when implementing the OpenID open standard.
Implementing an SSO based on OpenID requires 2 parts:
- RP: Relying Party application requesting to authenticate a user
- OP: OpenID Provider accepting OpenID requests to authenticate user
What's mostly important about SSO with OpenID is that users are not requested to provide their own credentials to the RP. For instance, you want to login to www.stackoverflow.com (the famous online forums), instead of creating a new account with Stackoverflow, you simply request to authenticate with Google account. Automatically, you get redirected to Google Login page, enter your credentials (you get authenticated) and you are redirected back to Stackoverflow as an Stackoverflow Authenticated user. Beautiful!
In this article, I will demonstrate how you can prepare your RP to connect to several OPs out there to authenticate your users without having them to register/provide their own credentials to your RP. I'm sure now you know the beauty and importance of this process as it allows faster access to the social media in the net without going through the hassle of creating new accounts and having to memorize all those geeky passwords!!
Tools
To start using OpenID in your application (RP) you can, as one option, implement your own implementation of the OpenID specifications! The links in the prerequisites help you in doing so. However, a word that has been following my ears since I started studying about development "Don't Reinvent the Wheel". There are several APIs out there that already implement the OpenID specifications for you and handle all HTTP Requests/Responses & OpenID Dance with OP. The one I choose for this article is DotNetOpenAuth. I would recommend the following readings to grasp using the DotNetOpenAuth:
During the course of learning DotNetOpenAuth, I found myself faced with several questions/problems that I needed to post about on StackOverflow.com. The DotNetOpenAuth team represented by Andrew Arnott, is thankful for all the help and support he did provide me to make my experience with DotNetOpenAuth and OpenID a successful one. The library is a C# library that has support for OpenID 1.1 specification.
As for the interface allowing users to choose with which OP to sign in, I recommend using OpenID Selector, a JavaScript OpenID selector providing a fancy interface to select an OP. It comes in multiple flavors, my favorite is JQuery one!
Integrating OpenID Selector into ASP.NET Web Forms App
All what you need to start with is an ASP.NET Web Form application. For this article, I am using Visual Studio 2010 / .NET 4.0. If you are new to ASP.NET 4.0 and Visual Studio 2010 Web Development, I recommend going through this link of useful tutorials: ASP.NET 4 and Visual Studio 2010 Web Development Overview
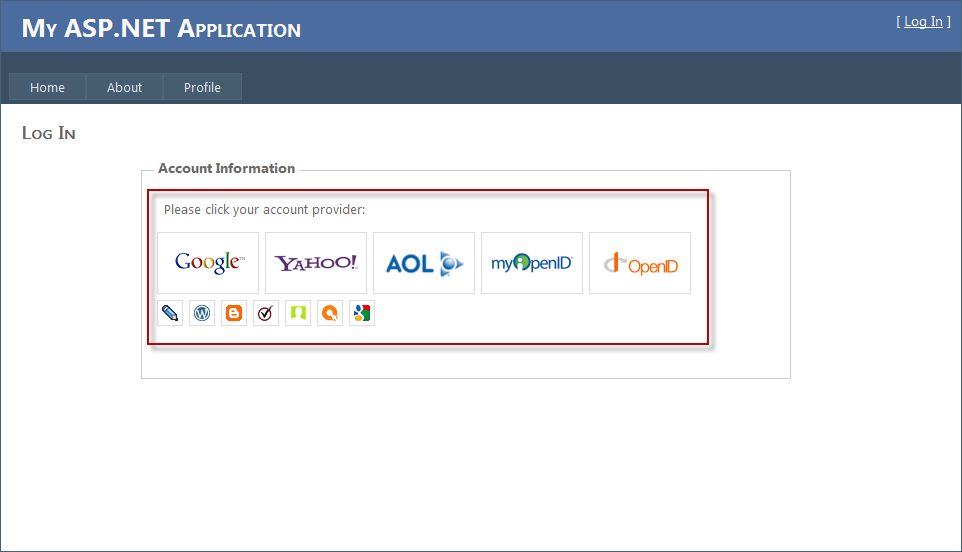
To start with, I will integrate the OpenID Selector into the Login.aspx page, you can check in the figure below how it will look like once added:
Adding the OpenID-Selector couldn't be any easier! To start with, download the package here: JavaScript OpenID Selector
Steps to integrate OpenID Selector to an ASP.NET Web forms app:
- Copy the images, css, images.small, images.large, and js folders and place them at the root of the application
- Prepare the actual HTML of the Login.aspx page.
The Login.aspx page that is part of the ASP.NET 4.0 Web Form template usually contains two Content panes: Header & Body Content panes.
HeaderContent:
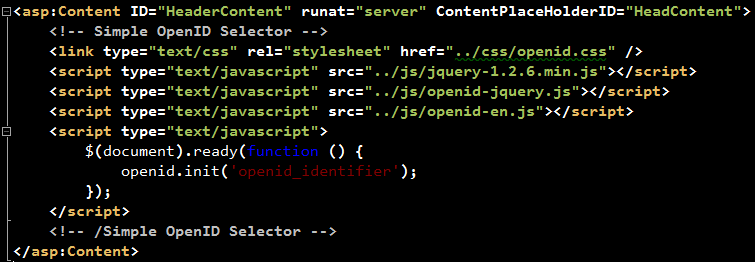
The HeaderContent should list all the JavaScript & CSS files needed by OpenID-Selector. In addition, a call to initialize the OpenID-Selector is inserted towards the end of the section.
BodyContent:
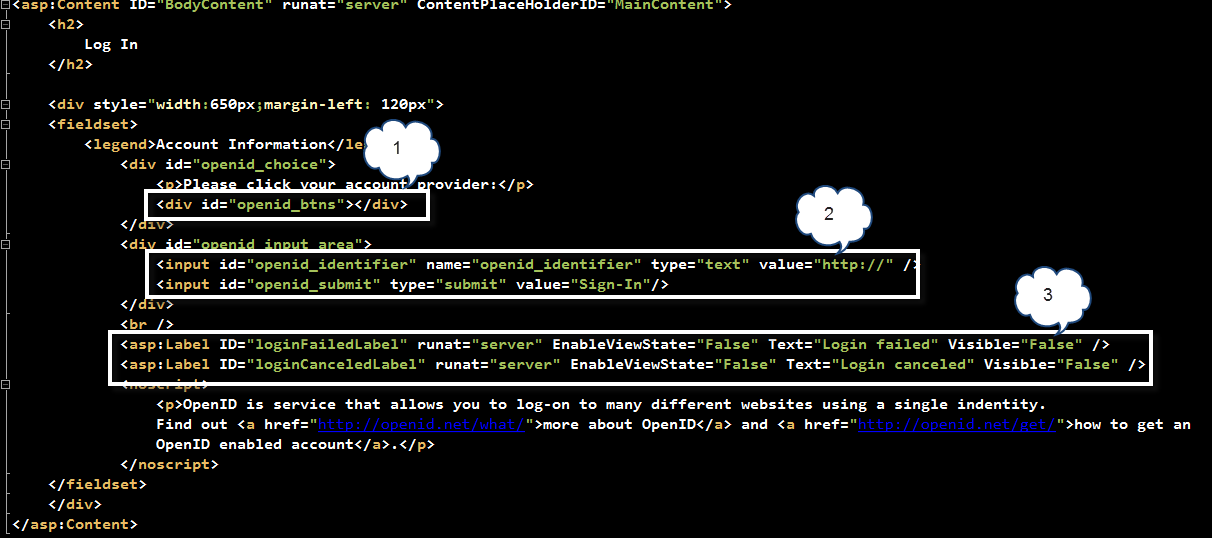
Rectangle #1 shows the "<div>" section that shall hold later on the images (small & large) for the available OP bundled with OpenID-Selector. This shall be filled automatically behind the scenes by the OpenId-Selector jQuery plugin.
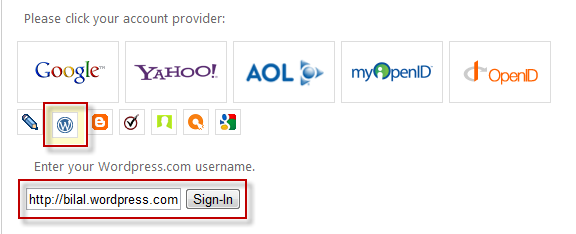
Rectangle #2 shows the "<div>" section that shall hold a free-input field together with a "Submit". In OpenID Selector, there are few OP images displayed as large icons, the rest of OPs are displayed as small images. When one of the small images is clicked, automatically, OpenID-Selector shows a free-input field to enter the OpenID account for that specific OP. Figure below shows an example:
Rectangle #3 shows two labels to inform the user whether the OpenID dance has failed or it was cancelled.
Now, run the Login.aspx page and you shall see a page similar to the one shown above!
Integrating DotNetOpenAuth into ASP.NET Web Forms App
Now that the UI is ready, what we are left with is using the DotNetOpenAuth library for the actual authentication process with OpenID known as OpenID Dance.
Let me summarize the OpenID Dance in 3 simple steps:
- RP sends an authentication request to authenticate the user and asking for some profile-related data for the authenticated user
- OP authenticate the user
- OP redirects back to the OR page that has been specified during the request. It defaults to the same page that sent the authentication request. However, this could be changed, but for the sake of this article, the default behavior will take place.
The Login.aspx page contains the following Page_Load implementation:

If the page is loading for the first time, this could be because the user has selected to Login, user was accessing a protected page on the Website and he/she was redirected to the Login page, or the RP has redirected back to this page (default redirect URL), the HandleOpenIdProviderResponse() method is executed. On the other hand, when the user clicks any of the OpenID images, this will cause a PostBack and hence the HandleRelyingPartyRequest() method executes.
HandleRelyingPartyRequest() method:
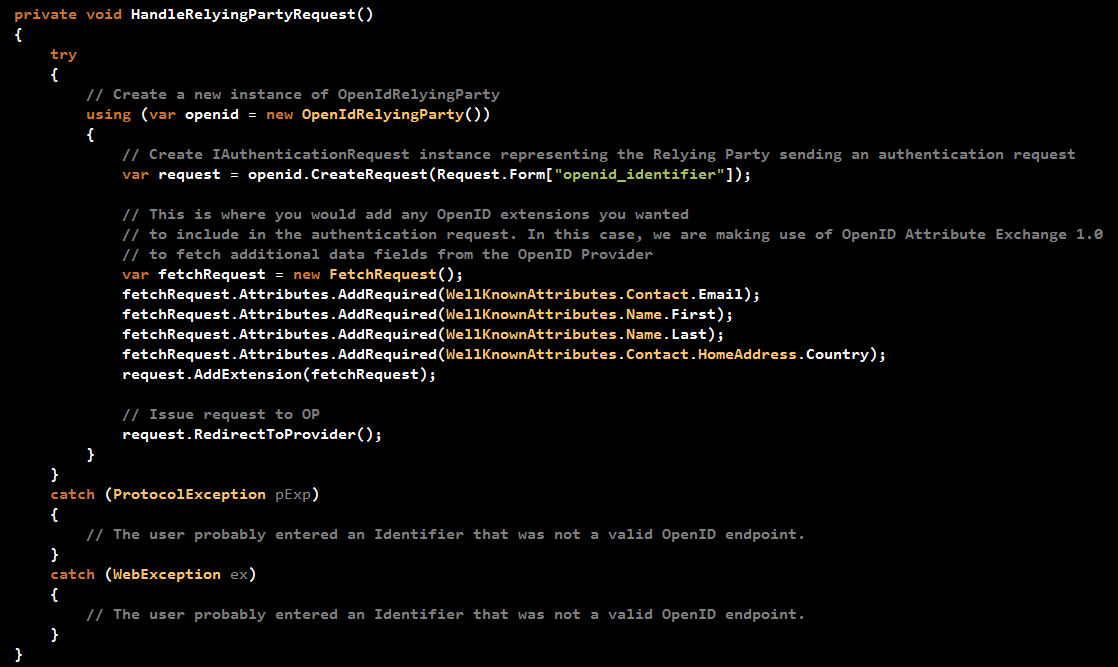
The method starts by initializing a variable of type OpenIdRelyingParty class. This class is your gateway to authenticate with OpenID using DotNetOpenAuth. It represents the relying party sending an authentication request and receiving an authentication response from the OP.
After that, the code prepares a request to a specific OpenID Identity. The OpenID Identity has been populated when you clicked on one of the OPs on the page. Each OP has its own OpenID Identity. For instance, Google has the following OpenID Identity: https://www.google.com/accounts/o8/id
The OpenID-Selector automatically populates a Form field named "openid_identifier" with the OpenID Identity upon clicking any of the OPs images.
The code then attaches to the request some "demands" or "requests" asking the OP to send back some user related profile data. In this example, the RP is requesting the "Email", "First Name", "Last Name", and "Country". the AX Extension is being used in this case rather than SREG extension as it provides more accessibility to user's profile data. Google does support AX Extension, however you should always check whether a specific OP you would like to integrate into your application, allows SREG or AX or both.
The call for "RedirectToProvider()" does exactly as it says. A redirect to the OP is performed so that the OP could authenticate the user.
HandleOpneIdProviderResponse:
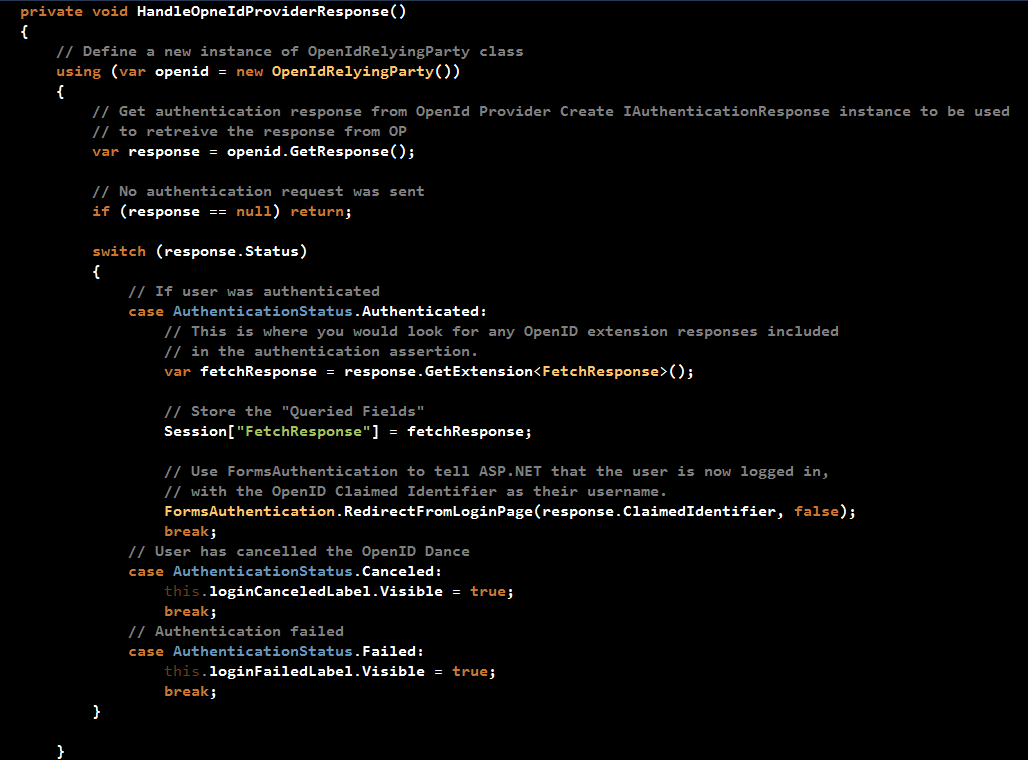
As mentioned before, this method will be called in two places:
- When the page loads for the first time
- When a response is received from the OP
The method starts by creating an instance of the OpenIdRelyingParty class, then followed by a call to "GetResponse()" to retrieve a response from the OP. If the method is being called when the page loads for the first time, then the response will be null and the method returns. However, in the case the method is called after a redirect from OP, then there will be a valid response (assuming no exceptions).
The code then checks the response's Status property to decide on the next action to take. The different statuses are: Authenticated, Cancelled, and Failed.
What matters for us now is the Authenticated status. If the OpenID Dance succeeds, then the code retrieves the "profile-user-related-fields" that have been requested when an authentication request was being prepared. Store the data in a Session variable, and then asks from ASP.NET authentication system to consider the user as an authentication user on the ASP.NET Web Form application by creating an authenticating cookie and redirecting the user to the request resource on the Website.
The source code used in this sample application is part of the samples bundled with DotNetOpenAuth download.
Let's dance with OpenID!!
- Visit http://samples.bhaidar.net/openidsso
- Click on "Log In" link at the top right of the page

- In case you're not already logged in to Google, you will be redirected to Google to get authenticated
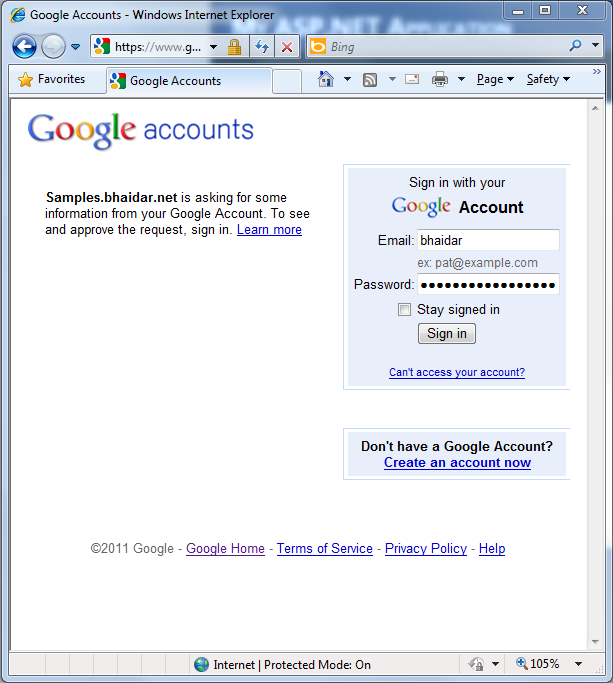
Once you supply your username/password, Google will authenticate your credentials and redirect you back to the home page. If you still remember from the code above, an authentication cookie is created for the user and he/she gets redirected to the home page.
- Click on the "Profile" page
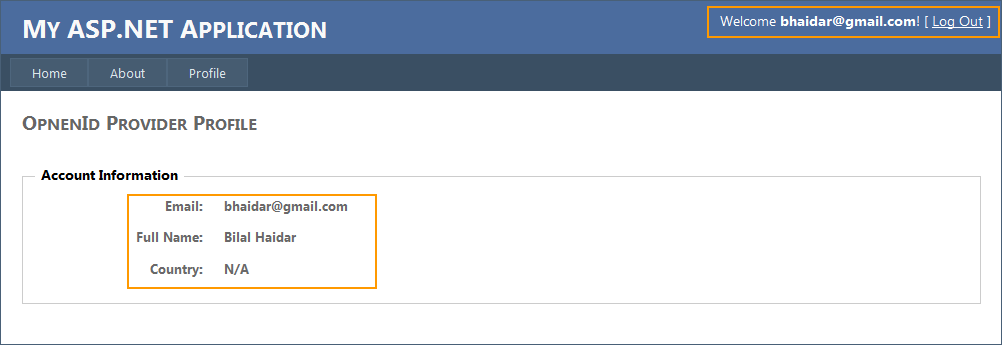
You notice at the top right section of the page, the application is now welcoming you by stating "Welcome [email protected]". Also in the body of the page, you can see that the application is relying on Google, the openid provider, in this case to retrieves the Email, Full Name, and Country.
That's it for integrating OpenID with ASP.NET Web Form applications. You can try a running sample here: OpenID in ASP.NET Web Forms - Single Sign On. You can also download the sample application to play with offline GoogleOpenIdSSO.zip (5.23 mb).
If you liked this article, then wait for my coming article on OAuth to complete the cycle of OpenID Authentication and OAuth Authorization both integrated into ASP.NET Web Form applications.
Last but not least I would like to extend my thanks to Andrew Arnott for his support on DotNetOpenAuth and ServerIntellect Support team in helping me resolve some server-side issues when hosting the sample demo.
HTH
Regards
Tags: ASP.NET v4.0, OpenID, DotNetOpenAuth